This quest is part of the
Champion of Mustafar questline.
You will
need a group in order to complete this quest.
This dungeon/instance involved in this quest has a lockout timer and is repeatable!
- Once you enter, the timer starts!
- Do NOT enter the dungeon/instance until you have a group and are ready!
This instance grants 4
Mustafar Trials Tokens upon completion.
Level: 80
Description:
With the droid army defeated, HK-47's plans have been temporarily thwarted. You must find a way inside the droid factory to find out exactly what HK-47 is planning and perhaps find a way to defeat him for good.
Recommended combat level: 80 and with a group
Operational Droid Factory
Before entering the Operational Droid Factory, also known as Droid Factory 2 or DF2, here is some information on what awaits you.
- This dungeon/instance is timed at an hour
- After the hour you will be locked out until the daily reset
- This will not be easy - be prepared!
- Highly recommend crafted armor with Skill Enhancing Attachments(SEAs), also known as tapes
- Bring consumables; food and spice
- It is especially important to bring damage mitigation food, such as Exo-Protein Wafers and Synthsteak
- Doctor and entertainer buffs
- Highly recommended to bring three players that have a taunt ability for the final encounter
- If your group happens to wipe, you are allowed to re-enter the dungeon/instance, given that the timer has not expired
- During the final encounter if any of the reactive nuclear material gets destroyed, you will fail the instance and be kicked out
- You will not be able to re-enter and will need to wait until the daily reset
Summary of Instance
- The task in this dungeon/instance is to:
- Each of these encounters has a mechanic that must be followed
Once you are ready, head to the Operational Droid Factory with your group. When you are all ready, press tilda(~) on the doors and select
Operational Droid Factory to enter the dungeon/instance.
/way Mustafar 3410 -997 Operational Droid Factory - DF2;
If it is your first time:
- You will need to click on the Systems Terminal on the right side of the entrance and you will receive Droid Factory Records
- Run over to the left side of the entrance and click on the Blast Door Control terminal
- It will prompt you for a code
- You can find the code in the records you received from the Systems Terminal or reveal the spoiler below for the code
- Once you enter the code into the Blast Door Control terminal, you will get a prompt saying that the access code has been accepted and that the blast doors are unlocked
- You can now run up the ramp and press tilda(~) on the blast doors and select Operational Droid Factory to enter the dungeon/instance
Boss 1: HK-58 Aurek and HK-58 Besh
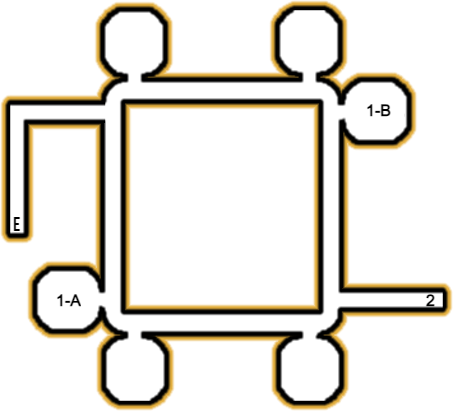
In this section, you need to split your group into two. You will see a room on either side containing either HK-58 Aurek or HK-58 Besh. This encounter requires that the damage done to the droids is, more or less, equal. Failure to do so will cause massive group-wide damage.
Use the provided map to help you navigate through through the first section of the Operational Droid Factory.
- E: Entrance/Exit
- 1-A: HK-58 Aurek
- 1-B: HK-58 Besh
- 2: Path to next section
It is recommended that in each room there will be:
- 1 tank
- 1 dedicated healer for the tank (This doesn't have to be a medic)
- 2 DPS
You don't need this exact composition, but the the idea of this is to
make sure you keep the damage the same between rooms.
If HK-58 Aurek or HK-58 Besh have a
10k health difference between them, you will see a message about losing equilibrium and
everyone will explode most, if not all, will end up incapacitated and the droids will reset.
It is recommended to have one person per room call out the health and should there be a difference of more than 5k health, the one with less health calls for their room to stop attacking (everyone except their tank) until the other room catches up.
Once your group has defeated the two droids, you can continue down into the droid factory, number
2 on the map.
Boss 2: The Devastator Droid
For this encounter, the boss will be immune to damage until an item is retrieved from one room and deposited in the other. You will need to designate one player as a runner. The goal of the runner is bring this item from one room to the next over the duration of the fight. They will not need to worry about damage.
It is recommended to pick the lowest DPS or the fastest player to be the runner.
- A player with the Sprint Enhancement Stim
- A Jedi with Force Run
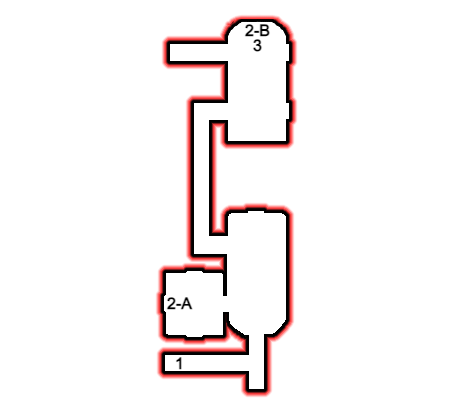
Use the provided map to help you navigate through through this section of the Operational Droid Factory.
- 1: From the previous section, make your way down the hallway
- 2-A: Inhibitor Storage Unit
- 2-B: Reactive Repair Module
- 3: The Devastator Droid
The whole group should make their way to The Devastator Droid(
3) and start applying debuffs to the droid. The Devastator Droid will be immune to damage until the runner interacts with the
Inhibitor Storage Unit(
2-A) and runs to the
Reactive Repair Module(
2-B) and interacts with it.
If done successful, you will get an on-screen message:
- The Devastator begins to falter as their RRU loses power
Once you see this message, The Devastator Droid will be vulnerable and will start to take damage. Everyone, besides the runner, should use their offensive cooldowns to maximize damage during this window.
The runner should return to the
Inhibitor Storage Unit(
2-A) and repeat the process.
- If the runner interacts with the Inhibitor Storage Unit(2-A) during the damage window, they will get the message:
- Inhibitor Unit In Production
- Stay near the Inhibitor Storage Unit(2-A) until the damage phase concludes and the runner will get the message:
- You have taken an inhibitor rod
Around 30 seconds later and you will see the message:
- You hear a hum as the RRU reboots
This means the Devastator droid is no longer going to take damage until a rod is put in to the
Reactive Repair Module(
2-B on the map) again and can only have debuffs applied to it.
Rinse and repeat until you take it down.
Once your group has defeated the Devastator Droid, you can continue down into the droid factory.
Boss 3: The Master Droid Engineer and Fixer One
For this encounter, there will be a large number of droids that will continuously spawn and attack your group while fighting the boss. This encounter is pretty much a race to defeat the boss before your team gets overwhelmed by the droids that are spawning.
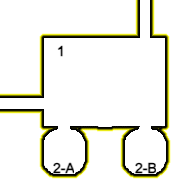
Use the provided map to help you navigate through through this section of the Operational Droid Factory.
- 1: Master Droid Engineer & Fixer One spawn location
- 2-A: Location where droids are spawning
- 2-B: Location where droids are spawning
Since there will be a lot of smaller droids attacking you and your group, it is recommended to be using AoE abilities to mitigate the damage taken. It is also recommended that the group stacks on a single point.
To start the encounter, simply attack the Master Droid Engineer (
1). Once combat initiates, droids will start spawning from
2-A and
2-B, start entering the main room, and attacking you and your group. Focus on the Master Droid Engineer while using AoE abilities. After the Master Droid Engineer is defeated another droid, Fixer One (
1), will spawn. Repeat the process you did on Master Droid Engineer with using AoE abilities and doing as much damage as possible.
Once your group has defeated the Master Droid Engineer and Fixer One, you can continue to the final encounter.
Boss 4: Doom Bringer
In this section, you and your group will fight the final boss of the Operational Droid Factory, Doom Bringer. For this encounter, your group must destroy all of the
Hand of Doom droids while protecting the
Reactive Nuclear Material. Once all of the
Hand of Doom droids are destroyed, you can start fighting Doom Bringer.
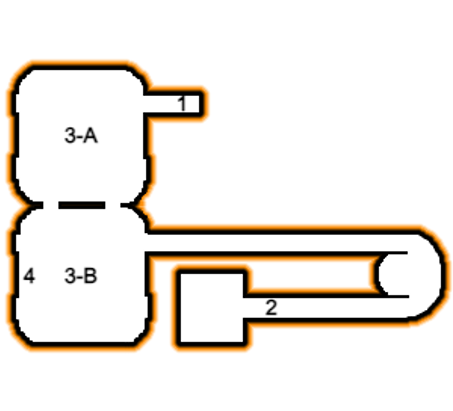
Use the provided map to help you navigate through through this final section of the Operational Droid Factory.
- 1: From the previous section, make your way down the hallway
- 2: Spot to start encounter
- 3-A: Reactive Nuclear Material and Hand of Doom droids
- 3-B: Doom Bringer Room
- 4: Doom Bringer
It is recommended to bring three players that have the taunt ability
Important: Do not use AoE abilities in this encounter, as you may accidently destroy the Reactive Nuclear Material in room 3-A!
To start the encounter, a player will need to make their way to the room towards towards the end of the bridge (
2). The player will see HK-47 running away into this room, before there is an explosion and getting a message from HK-47. After this, the encounter officially begins.
This encounter has two parts.
- Destroy all of the Hand of Doom droids and protect the Reactive Nuclear Material in room 3-A
- Destroy Doom Bringer(4) in room 3-B
Part 1
3
Hand of Doom droids will become attackable and will try to damage the
Reactive Nuclear Material at the center of room
3-A
- If the Reactive Nuclear Material reaches 0 HP, you will be ejected from the instance and will not be able to enter
The three players with taunt will each taunt a
Hand of Doom droid and pull them into the
3-B room. One of the
Hand of Doom droids will turn into a droid named
Doom Bringer. Your group will want to attack this droid.
Over the course of the fight, the
Hand of Doom droids will take turns becoming
Doom Bringer. Your group will have to keep changing targets to concentrate on the
Doom Bringer droid.
After you destroy the droid named
Doom Bringer, it will cause one of the other
Hand of Doom droids to become
Doom Bringer and it will cause another
Hand of Doom droid to become attackable in the
3-A room. The players with the taunt ability must pay attention to when the
Hand of Doom droids become attackable, so that they may taunt them and pull them into the
3-B room.
Repeat this process of changing targets to attack the
Doom Bringer droid and taunting and pulling new
Hand of Doom droids as they become attackable into the
3-B room until there are no more
Hand of Doom droids left.
Once there are no more
Hand of Doom droids left, the real
Doom Bringer(
4) in room
3-B becomes attackable and the second part of the encounter begins.
Part 2
Destroy the Doom Bringer while avoiding the use of AoE abilities. This part is rather simple and there are no special mechanics involved.
As soon as you defeat Doom Bringer, you will receive a quest update.
Go back to the Mining Facility and report your findings to Milo Mensix to complete this quest and start the next one in the questline.
/way Mustafar 147 130 Milo Mensix;
Reward:
Following Quest:
Destroy HK-47 >>
Boss Statistics
Difficulty:
Fun /
Normal /
Hard /
Nightmare
HK-58 Aurek and HK-58 Besh
Inhabits
- Planet: Mustafar
- Area: Operational Droid Factory
Basics
- Natural CL: ?? / 82 / ?? / ??
- Health: ?? / 101,010 / ?? / ??
- Aggressive: Yes
- Deathblows: Yes
- Difficulty: Boss
Attacks
- Ranged
- Large amount of group-wide damage
- If the droids have a 10k health difference between them
Loot
Devastator
Inhabits
- Planet: Mustafar
- Area: Operational Droid Factory
Basics
- Natural CL: ?? / 83 / ?? / ??
- Health: ?? / 202,020 / ?? / ??
- Aggressive: Yes
- Deathblows: Yes
- Difficulty: Boss
Attacks
Loot
- A Warmly Glowing Rod
- Cybernetic Legs (Burst Run)
- Devastator Lava Cannon (Normal, Epic, and Legendary variants)
- Devastator Acid Launcher (Normal, Epic, and Legendary variants)
The Master Droid Engineer
Inhabits
- Planet: Mustafar
- Area: Operational Droid Factory
Basics
- Natural CL: ?? / ?? / ?? / ??
- Health: ?? / ?? / ?? / ??
- Aggressive: Yes
- Deathblows: Yes
- Difficulty: Boss
Attacks
Loot
- Engineer Sword (Normal, Epic, and Legendary variants)
- Engineer KYD-21 (Normal, Epic, and Legendary variants)
Fixer One
Inhabits
- Planet: Mustafar
- Area: Operational Droid Factory
Basics
- Natural CL: ?? / ?? / ?? / ??
- Health: ?? / ?? / ?? / ??
- Aggressive: Yes
- Deathblows: Yes
- Difficulty: Boss
Attacks
Loot
Doom Bringer
Inhabits
- Planet: Mustafar
- Area: Operational Droid Factory
Basics
- Natural CL: ?? / 90 / ?? / ??
- Health: ?? / 666,666 / ?? / ??
- Aggressive: Yes
- Deathblows: Yes
- Difficulty: Boss
Attacks
Loot
- A Warmly Glowing Magseal Detector
- Doom Bringer Obsidian Sword (Normal, Epic, and Legendary variants)
- Doom Bringer DP-23 (Normal, Epic, and Legendary variants)
- Doom Bringer Scatter Pistol (Normal, Epic, and Legendary variants)
- Old Republic Personal Shield Generator Schematic